Ultrasound guidance is a useful technique to aid central venous access. Alignment of the ultrasound probe and visualisation of the needle is a skill that takes some practice. This article describes how to perform ultrasound guidance to gain central venous access via the internal jugular, femoral and axillary/subclavian veins.
Introduction
Central venous catheterisation is ubiquitous in hospital practice. Complications may occur in 10% of cases using surface landmark techniques.1,2 When used to locate vessels and give real-time guidance, ultrasound limits these complications.3 The UK National Institute for Health and Clinical Excellence (NICE) suggests ultrasound guidance is used for elective cannulation of the internal jugular vein. However, similar advantages are seen for cannulation of veins and arteries at other sites in elective and acute situations.
Preparation
Monitor the patient with pulse oximetry, electrocardiography and non-invasive blood pressure measurement. Establish peripheral intravenous access and offer conscious sedation. Place the patient 15o head down with arms supported by their sides. Ensure the field is aseptic, image the vein at the chosen site with the ultrasound and infiltrate the skin and subcutaneous tissues with local anaesthetic.
Ultrasound
Ultrasound probes of 7–10 MHz are suitable. Arteries are identifiable as they pulsate and are difficult to compress. Veins are non-pulsatile, easily compressible, have respiratory variation, and distend when the patient is tilted or performs the Valsalva manoeuvre.4,5 Real-time images are easier to interpret because of these dynamic findings. Doppler verification may also be used.
Position the ultrasound display at eye level on the opposite side of the patient to the operator. Place the probe lightly on the skin (the vein will collapse easily). Choose a site where the vein lies side-by- side with the artery (rather than anterior to it) as the vein will often need to be transfixed to puncture its anterior wall. If the vein is transfixed, successful aspiration then occurs on gentle withdrawal of the needle.
Transducer and display set-up
Touch one side of the probe and observe the image to allow orientation. A palpable marker is often present on the side of the transducer corresponding to the marker on the display. Adjust the depth to ensure structures are visualised in the centre of the screen. Alter the gain to create a dark image that allows discrimination of the white dot generated by the needle. Use sterile ultrasound gel inside and outside the protective sterile sheath.
Guidance techniques
Needles can be guided through tissues directly and indirectly.6
Indirect ultrasound guidance
This involves the identification of a patent non-diseased vessel prior to puncture. Mark the skin and estimate the angle and depth of the needle course. Collateral structures may still be hit if the approach of the needle is not correct.
Direct ultrasound guidance

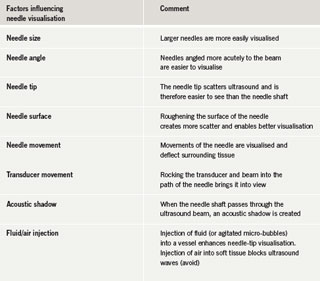
This involves the use of ultrasound to visualise the needle in real time. There are two techniques – the use of needle guides and freehand puncture. An appreciation of appearances of needles crossing the ultrasound beam in transverse (short axis) and longitudinal (long axis) is required. Other factors affecting needle visualisation are summarised in table 1.
Needle guides direct the needle in a pre-determined direction to various depths from the transducer surface, depending on the selected angle of the guide.7 Guides vary and may be fixed or detachable from the transducer. Guidance lines generated on the display show the projected path of the needle. Adjust the probe so the target vessel lies within the guidance lines and assess the depth. With the probe held still, clamp the needle in the guide and pass it through the tissues either to a pre-determined depth or until the needle tip is positioned in the vessel.
For freehand puncture, hold the needle with one hand and the transducer with the other. This approach provides greater flexibility without having to use secondary instruments and allows for subtle compensatory adjustments.
Short- and long-axis approaches
Short axis
Insert the needle at a shallow angle until the tip (a white dot) enters the ultrasound beam. Withdraw slightly, realign more steeply and advance until seen again in a deeper position. Repeat, correcting the insertion direction to approach and puncture the vessel centrally. Because this approach gives poorer visualisation of the needle (the needle tip may be mistaken for the needle shaft), the position of the needle tip may need to be re-established by either rocking the transducer or realigning the needle in a more vertical plane. A needle passing through the ultrasound beam in short axis produces an acoustic shadow, seen as a black line passing to the base of the image.
Long axis
Though this allows better needle visualisation, practice is required to keep the needle precisely within the image plane and the target vessel within the beam. Novices may find this method more difficult.8
Verification of needle-tip placement
Irrespective of the technique used, verify the needle-tip placement by either aspirating blood or noting the vein to re-open following collapse due to the pressure of the advancing needle. The vein wall may occlude the needle tip, which appears to lie within the vessel lumen.
Internal jugular vein cannulation


The vein lies surprisingly superficial (1–2 cm) and is close to the carotid artery (figure 1). The thyroid is easily visible with a characteristic grey appearance. Lymph nodes may be mistaken for vessels but are non-compressible and moving the probe up and down shows their outline.
Axillary/subclavian vein cannulation
The conventional flat approach to the subclavian vein is not possible with ultrasound as the clavicle obscures visualisation. Instead, move laterally over the deltopectoral triangle to visualise the axillary artery and vein and branches, in particular the cephalic vein (figure 2). The axillary vein is the continuation of the basilic vein and extends from the outer border of teres major to the outer border of the first rib. On moving laterally to the axillary vein, the artery and vein are further apart, and the rib cage and pleura fall away (a misplaced needle transfixing the vein does not hit vital structures). The brachial plexus is just cephalad to the artery.
Femoral vein cannulation


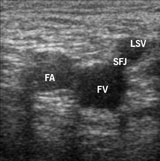
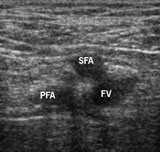
The side-by-side orientation of the femoral vein, artery and nerve as depicted in anatomy texts is an oversimplification, and only true at the level of the inguinal ligament, which is difficult to palpate in most subjects. Below this level lies the saphenofemoral vein junction, and the arterial bifurcation into deep and superficial femoral branches. The superficial artery overlies the femoral vein, making access difficult. The use of ultrasound allows differentiation of these structures and accurate first pass puncture of the common femoral vein immediately below the inguinal ligament (figures 3 and 4). For arterial access, ultrasound guidance allows the choice of the most appropriate site for puncture in the common femoral artery with avoidance of heavily diseased areas.
Conclusion
Ultrasound guidance is a useful technique to aid central venous access. It is effective in difficult cases,9 allows easy cannulation of the veins10,11 and reduces complications. Similar advantages should apply for arterial access. Though alignment of the ultrasound probe and visualisation of the needle is a skill that takes some practice, the time spent understanding and practising the technique will be repaid many times over when performing invasive procedures.
Conflict of interest
Andrew Bodenham has recieved honoraria from Sonosite for teaching in this area of practice.
Key messages
- Routine use of ultrasound guidance significantly reduces the risk of procedural complications during central venous access. Practice is required to use it to best effect
- The National Institute for Health and Clinical Excellence (NICE) has recommended its use in central venous access and is auditing compliance in this area
- It can potentially be used at all sites of vascular access including the axillary/subclavian vein and peripheral arteries
- It is particularly useful in the more difficult case
References
- Mansfield PF, Hohn DC, Fornage BD, Gregurich MA, Ota DM. Complications and failures of subclavian-vein catheterization. N Engl J Med 1994;331:1735–8.
- Sznajder JI, Zveibil FR, Bitterman H, Weiner P, Bursztein S. Central vein catheterization. Failure and complication rates by three percutaneous approaches. Arch Intern Med 1986;146:259–61.
- Randolph AG, Cook DJ, Gonzales CA, Pribble CG. Ultrasound guidance for placement of central venous catheters: a meta-analysis of the literature. Crit Care Med 1996;24:2053–8.
- Armstrong PJ, Sutherland R, Scott DH. The effect of position and different manoeuvres on internal jugular vein diameter size. Acta Anaesthesiol Scand 1994;38:229–31.
- Troianos CA, Jobes DR, Ellison N. Ultrasound-guided cannulation of the internal jugular vein. A prospective, randomized study. Anesth Analg 1991;72:823–6.
- Chapman GA, Johnson D, Bodenham AR. Visualisation of needle position using ultrasonography. Anaesthesia 2006;61:148–58.
- Reid MH. Real-time sonographic needle biopsy guide. Am J Roentgenol 1983;140:162–3.
- Blaivas M, Brannam L, Fernandez E. Short-axis versus long-axis approaches for teaching ultrasound-guided vascular access on a new inanimate model. Acad Emerg Med 2003;10:1307–11.
- Hatfield A, Bodenham A. Portable ultrasound for difficult central venous access. Br J Anaesth 1999;82:822–6.
- Galloway S, Bodenham A. Ultrasound imaging of the axillary vein–anatomical basis for central venous access. Br J Anaesth 2003;90:589–95.
- Sharma A, Bodenham AR, Mallick A. Ultrasound-guided infraclavicular axillary vein cannulation for central venous access. Br J Anaesth 2004;93:188–92.
